Re: The Milky Way Over The Sierra Thread
Posted: Thu Aug 27, 2015 1:20 pm
Have never taken any of the newer era low light sensor DLSR night sky images but recently spent some time studying what it is about. I have however been taking North Star circular star trail images on film for decades and have some nice shots even on 4x5.
With star trails, strategy is to topo analyze high elevation Sierra locations for interesting silhouette landscapes towards the north. One does not want the silhouetted ridge lines to rise up too many degrees because the dark areas below skylines even when they are light granite or covered with areas of snow tend to be boring. Thus better to fill such frame space with more of the sky. One can do the trig for determining how high a ridge may appear in a frame beforehand unless one has actually taken night shots at a location. Here is a primer:
http://www.davidsenesac.com/Information ... _view.html
Then plan a visit when air is clear with no moon. Quite a lot of Sierra visitors tend to be impressed by even hazy night skies on moonless nights simply because they are unfamiliar. Believe me when I say that exceptionally clear air is noticeably more impressive. Of course August in this era has become horrible with all the smoky fires. A few of us given the drought were predicting backpacking this late summer might be the worst ever and that seems to have come true. Clearer skies are more likely in the fall or spring when cold clear dry air behind cold fronts moves in. That of course is also best for alpenglow subjects. Another choice is to use impressive tree silhouettes. Sierra juniper, foxtail pine, and bristlecone pine are going to offer some of the best. One needs to find subjects that stick up above landscapes into the sky. Since I have a huge body of work of daylight illuminated trees, already have some really strong ones sized up to return to for this new era night work.
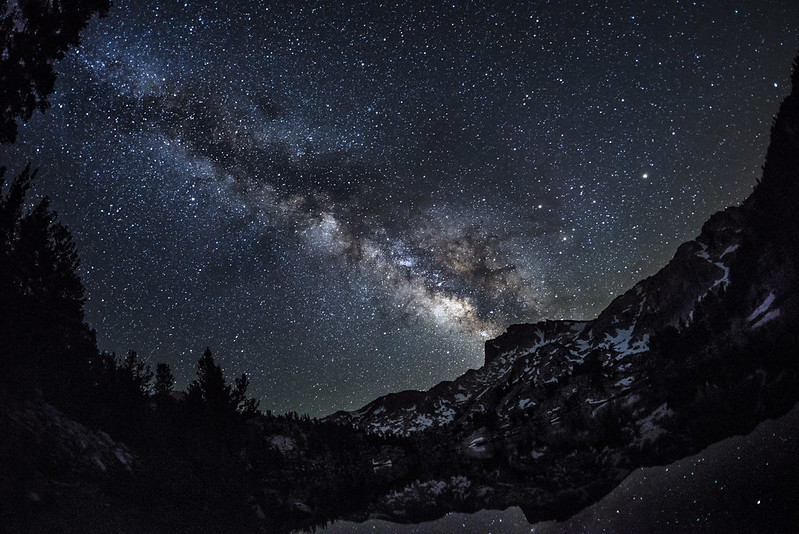
Shooting the Milky Way moves one's camera in the opposite orientation more to the south. This is where I will have some learning to do. Some of the same things apply versus star trails like subjects that don't rise up too many degrees while still having interesting shapes. What one can add is water reflections below and that is one type I've been keen to size up.
For the serious photographer much of the information to get started is just a matter of studying online information on photographing night skies although information on most such sites tends to be mediocre. For instance few sites suggest such obvious strategies as taking throw-away preliminary framing adjustment shots using highest ISOs. And there is huge advantage to using software for figuring out what a night sky is going to look like from a specific location and time of night before getting out in the field. Like this:
http://www.stellarium.org/
Especially if such requires any serious driving then hiking to get to. One has to understand that just because one might have taken a night picture from some lake a few years ago does not mean it will be so again unless one visits at near dates of season. That is because the night sky is continually seasonally changing. Small lakes and ponds that are not in drainages that night sumping air flows down are likely to have calmer water versus larger bodies of water. That is extra important to avoid blurring because shutter speeds will be slow with even the best sensors. As an example, the ponds at Island Pass with nothing blocking to the south and more distant will likely work better than down at the shores of Thousand Island Lake. And Nydiver Lakes that are up on a high bench without much blocking towards the south and southwest are going to work far better than down in a deep hole like Ediza Lake where cold sumping night air from higher up in the drainage is also likely to make the surface wavy. For the same latter reason, calm at Ediza is usually brief about mid-mornings as up canyon breezes from expanding canyon air balances the two flows.
I recently received a Sigma 19mm F2.8 DN wider lens to complement my 30mm and 60mm so will be using that lens for night work. Have seen some nice work using stitch blending of multiple frames so don't expect a need for anything wider.
For those interested in printing such images, I would suggest finding a commercial printing service that can do Kodak Professional Duratrans Display Material because the contrast levels involved using traditional printing media are too weak. Using a back lit display box gives such prints vastly more impact. The media is quite robust too so prints can be displayed without protective glass.
http://duratrans.com/
David
http://www.davidsenesac.com/2015_Trip_C ... les-0.html
With star trails, strategy is to topo analyze high elevation Sierra locations for interesting silhouette landscapes towards the north. One does not want the silhouetted ridge lines to rise up too many degrees because the dark areas below skylines even when they are light granite or covered with areas of snow tend to be boring. Thus better to fill such frame space with more of the sky. One can do the trig for determining how high a ridge may appear in a frame beforehand unless one has actually taken night shots at a location. Here is a primer:
http://www.davidsenesac.com/Information ... _view.html
Then plan a visit when air is clear with no moon. Quite a lot of Sierra visitors tend to be impressed by even hazy night skies on moonless nights simply because they are unfamiliar. Believe me when I say that exceptionally clear air is noticeably more impressive. Of course August in this era has become horrible with all the smoky fires. A few of us given the drought were predicting backpacking this late summer might be the worst ever and that seems to have come true. Clearer skies are more likely in the fall or spring when cold clear dry air behind cold fronts moves in. That of course is also best for alpenglow subjects. Another choice is to use impressive tree silhouettes. Sierra juniper, foxtail pine, and bristlecone pine are going to offer some of the best. One needs to find subjects that stick up above landscapes into the sky. Since I have a huge body of work of daylight illuminated trees, already have some really strong ones sized up to return to for this new era night work.
Shooting the Milky Way moves one's camera in the opposite orientation more to the south. This is where I will have some learning to do. Some of the same things apply versus star trails like subjects that don't rise up too many degrees while still having interesting shapes. What one can add is water reflections below and that is one type I've been keen to size up.
For the serious photographer much of the information to get started is just a matter of studying online information on photographing night skies although information on most such sites tends to be mediocre. For instance few sites suggest such obvious strategies as taking throw-away preliminary framing adjustment shots using highest ISOs. And there is huge advantage to using software for figuring out what a night sky is going to look like from a specific location and time of night before getting out in the field. Like this:
http://www.stellarium.org/
Especially if such requires any serious driving then hiking to get to. One has to understand that just because one might have taken a night picture from some lake a few years ago does not mean it will be so again unless one visits at near dates of season. That is because the night sky is continually seasonally changing. Small lakes and ponds that are not in drainages that night sumping air flows down are likely to have calmer water versus larger bodies of water. That is extra important to avoid blurring because shutter speeds will be slow with even the best sensors. As an example, the ponds at Island Pass with nothing blocking to the south and more distant will likely work better than down at the shores of Thousand Island Lake. And Nydiver Lakes that are up on a high bench without much blocking towards the south and southwest are going to work far better than down in a deep hole like Ediza Lake where cold sumping night air from higher up in the drainage is also likely to make the surface wavy. For the same latter reason, calm at Ediza is usually brief about mid-mornings as up canyon breezes from expanding canyon air balances the two flows.
I recently received a Sigma 19mm F2.8 DN wider lens to complement my 30mm and 60mm so will be using that lens for night work. Have seen some nice work using stitch blending of multiple frames so don't expect a need for anything wider.
For those interested in printing such images, I would suggest finding a commercial printing service that can do Kodak Professional Duratrans Display Material because the contrast levels involved using traditional printing media are too weak. Using a back lit display box gives such prints vastly more impact. The media is quite robust too so prints can be displayed without protective glass.
http://duratrans.com/
David
http://www.davidsenesac.com/2015_Trip_C ... les-0.html